Showing posts with label Vegetable Recipes. Show all posts

Tuesday, May 24, 2016

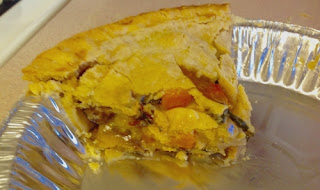
Vegetable Pot-Pie

The only kinds of pot-pie I think I ever had as a kid were the frozen ones from the grocery store. I can understand why my mom would opt for this. From scratch, a pot-pie can be a lot of work. The frozen ones cook up pretty quick in the microwave. I confess, those frozen ones are still guilty pleasures for me, from time to time.

As I started doing more vegetarian cooking, I became intrigued by the idea of a vegetarian version of the pot-pie. How would we create the savory flavors and stew-like filling I wanted, without meat? This recipe, modified from the America's Test Kitchen recipe, hits the mark pretty well. It's got surprising savoriness, and was easier to make than I thought it would be.

The original version of this recipe only used a top crust. I like crust on top and bottom of my pot pie, thank you, so that was the first change. I'm also a bit lazy. They make their own pie crust. I can do it, but I don't like to so, I used store bought crusts. Not as good as homemade, but I'd rather have pie than not. I prefer the rolled up dough, where you just thaw and unroll it over a pie plate. The only kind I've been able to find at my local grocery store, recently, is the kind that's already in a foil plate. You either use what you've got, or you go home so, I used those this time around. They come with two crusts per package, so I needed to thaw them and remove one of them from the pie plate for the top crust. You're more than welcome to make your own pie crust, though.

Equipment needed
9 1/2-inch pie pan (depending on your pie dough source)
paring knife
chef's knife
measuring cups and spoons
large spoon
Dutch oven or other large sauce pan with lid
mixing bowls
whisk
rimmed baking sheet
aluminum foil
pastry brush

Ingredients
2 frozen pie-crust doughs
4 Tbl butter
1 onion, finely chopped
8 oz. cremini mushrooms, trimmed and sliced
salt and pepper
1 medium sweet potato, peeled and cut into 1/2-inch pieces
1 medium turnip, peeled and cut into 1/2-inch pieces
3 cloves garlic, minced
1/2 tsp grated lemon zest
1 Tbl lemon juice
8 oz. Swiss chard, stemmed and cut into 1-inch pieces
2 Tbl all-purpose flour
2 cups vegetable broth
1/2 cup grated Parmesan cheese
1 Tbl dried parsley
1 large egg
1 tsp water
cooking spray

Directions
Thaw the pie crusts (unless you're using fresh). For the top crust, roll one dough smooth between two pieces of parchment paper. Put it in the refrigerator until needed. For the bottom crust, if using loose dough, gently center one in a 10-inch pie plate, leaving about a 1-inch overhang. If not, just leave it in the provided pan. If there are any cracks, smooth them together with a drop of water and your fingers. Lightly spray the bottom pie crust with cooking spray. (My mom says this helps keep the bottom dough from getting soggy.) Refrigerate until needed.

Adjust the oven rack to the middle position and pre-heat the oven to 400 degrees F.

Melt 2 Tbl butter in a Dutch over or other large saucepan over medium heat until the foaming stops. Stir in the onion, mushrooms and 1/2 tsp salt. Cook until the mushrooms release their liquid, about 5 minutes.

Stir in the sweet potato and the turnip. Reduce heat to medium-low, cover, and cook until potato and turnip begin to soften, about 8 minutes. Stir in the garlic, lemon zest, and parsley and cook until fragrant, about 30 seconds. Stir in the chard and cook until wilted, about 2 minutes more. Transfer everything to a bowl and set aside.

Now to make the roux. Melt the remaining butter in the empty pot over medium-high heat, until it stops foaming. Stir in the flour and cook for one minute. Gradually whisk in the broth, scraping up any browned bits from the bottom of the pan. Bring to a simmer and cook until it starts to thicken, about 1 to 2 minutes. Off the heat, whisk in the Parmesan, lemon juice, and 1/2 tsp salt. Stir in the reserved vegetables, along with any juice that's accumulated in the bottom of the bowl. Season with salt and pepper to taste.

Line a rimmed baking sheet with aluminum foil and place the prepared bottom pie crust/plate in the center. This will help keep your oven clean in case the filling boils-over, ease clean up, and makes it easier to put the pie in the oven if you happen to be using a foil pie plate. Transfer the vegetable mixture into the bottom crust of the pie, and smooth the top. Place the top crust on top. Fold up the bottom edge of the dough around the top dough, and crimp together. Cut four 2-inch slits in the top, with a paring knife, to vent the steam. Lightly beat egg and water in bowl, and brush over the top of the crust. Put the whole thing into the oven. Bake until the crust is golden brown and the filling is bubbling, about 30 minutes. Remove and let cool, on the baking sheet for 10 minutes or so before serving.

Makes 6 servings.


Friday, July 27, 2012

Lemon Asparagus


Some summer days are too hot for hot food. Cold food is definitely in order, but raw vegetables can get boring after a while. Fortunately, chilled asparagus can be just the thing on those occasions.

One of the great things about this dish is that the two major components, the asparagus and the lemon dressing, can be made in advance. Just don’t mix the two prior to serving.

Equipment Needed
Cutting board
Chef’s knife
Large cooking pot or Dutch Oven
Whisk
Measuring cups and spoons
Garlic press (optional)
Paper towels

Ingredients
2 pounds asparagus
1 garlic clove, minced
1 tablespoon salt for the boiling water
1/2 teaspoon salt for the dressing
1/4 cup lemon juice
1 tablespoon Dijon mustard
1 tablespoon honey
1/4 teaspoon ground black pepper
3/4 cup extra-virgin olive oil
1 tablespoon finely chopped green onion

Directions
Prepare a large bowl of ice water and set aside.

Remove one spear of asparagus from the bunch. Bend at the thicker end until it breaks. Use this as a guide to trim the tough ends from rest of the asparagus.

Bring 4 quarts of water to a boil in a large cooking pot. Add 1 tablespoon salt and the asparagus. Cook until just tender, about 3 minutes. Drain the asparagus immediately and transfer to the ice water to stop the cooking process. Drain and pat dry with paper towels. Refrigerate in a sealed container until needed.

To make the dressing, whisk together the lemon juice, 1/2 salt, honey, and black pepper in a small bowl. Slowly whisk in the oil to create and emulsion. Stir in the green onion. Refrigerate until needed.

When ready to serve, toss the asparagus with the dressing and arrange on a serving platter.

Makes 8 servings.

Monday, May 7, 2012

Broccoli with Garlic


Sometimes simple recipes are the best. They allow the flavor of just a few ingredients to take center stage. As much as I like to experiment and blend flavors, sometimes I just want to savor the pure flavor of a single perfectly cooked vegetable or fruit.

This recipe highlights broccoli’s natural savoriness with a bit of garlic. The technique is simple, combing braising and sauteing, leaving a tender, satisfying side dish. This technique can be used with other vegetables as well.

The size of the skillet is vital to cooking the broccoli evenly. For this recipe, a 12-inch skillet is ideal. You don’t want to overcrowd the pan, no matter what you’re cooking.

Equipment needed
Cutting board
Chef’s knife
Garlic press (optional)
Measuring cups and spoons
Large skillet (preferably non-stick)
Large spoon
Mixing bowls

Ingredients
1 bunch broccoli (about 1 1/2 pounds)
3 garlic cloves, minced
1/2 cup water
2 tablespoons olive oil
1/8 teaspoon red pepper flakes (optional)
2 tablespoons lemon juice
salt and pepper

Directions
Cut the florets off the broccoli using a chef’s knife. Slice the larger florets in half by slicing through the stem. Break off the woody bottom portion of the stalk and discard. Peel away the tough outer layer of the remaining stalk. Slice the peeled stalks into 1/4-inch thick slices.

Place the cut broccoli florets and stems in the skillet with the water. Cover and cook over medium-high heat until the water is simmering and the broccoli turns bright green, about 2 minutes. Uncover and cook until the water has evaporated and the broccoli is tender, about 5 minutes.

Push the broccoli to the sides of the pan, clearing a space in the center. Add the olive oil, garlic and red pepper flakes, if using. Mash the garlic into the pan using the back of a spoon, mixing into the oil. Cook for 10 seconds and then stir into the broccoli. Remove from the heat.

Stir in the lemon juice and season with salt and pepper to taste.

Makes 4 servings.


Monday, April 30, 2012

Broiled Asparagus


Asparagus is not one of the inexpensive vegetables and it’s no wonder. Farmer’s have to devote two years to it’s initial harvest; it doesn't come up the first year. It’s incredibly tasty, though. As such, you want to make sure you get the most flavor out of it. Broiling asparagus is one way to concentrate it’s delicate flavor and add a lovely caramelized touch. It’s also incredibly fast and easy.

When choose asparagus, try to find stalks with even thickness. I prefer thinner spears, around one-half inch in diameter. This is young asparagus and has the sweetest flavor.

While this recipe calls for extra-virgin olive oil, regular olive oil can be substituted. Served warm or at room temperature, broiled asparagus is a wonderful side to most any meal.

Equipment Needed
Cutting board
Chef’s knife
Measuring spoons
Rimmed baking sheet

Ingredients
1 pound asparagus
1 tablespoon extra-virgin olive oil
1/4 teaspoon salt
1/8 teaspoon ground black pepper
Lemon juice

Directions
Adjust an oven rack to 6 inches under the broiler element and heat the broiler.

Remove one asparagus spear from the bunch and bend it at the thicker end until it snaps. Use the broken asparagus as a guide to trim the woody ends from the remaining asparagus.

Put the trimmed asparagus onto a rimmed baking sheet. Toss the asparagus with the olive oil, and salt and pepper. You can add more salt and pepper, if you like, to taste. Arrange the spears into a single layer on the baking sheet. Broil the asparagus, shaking the pan every few minutes, until they are tender and lightly browned, about 8 minutes. Sprinkle with lemon juice before serving.

Makes 4 servings.

Try sprinkling sesame salt on it along with the lemon juice for an extra hit of nutty flavor.

Sunday, November 6, 2011

Twice-Baked Potatoes

You’d think that baking a potato once would be sufficient. It is, but why settle for sufficient when you can have glorious? Mashing that potato with cheese and then re-baking it in crispy potato shells turns sufficient into twice-baked potato elegance.

To cut down on the cooking time in oven, we’re going to microwave the potatoes a bit, first. While this recipe uses cheddar cheese, gruyere, feta, or almost any other cheese can be substituted.

Equipment Needed
Box grater
Cutting board
Chef’s knife
Measuring cups and spoons
Skewer
Rimmed baking sheet
Potato masher
Large spoon
Mixing bowls
Microwave

Ingredients
2 tablespoons butter, softened
4 medium russet potatoes, about 2 pounds, scrubbed clean
4 ounces cheddar cheese, shredded, about 1 cup
3 green onions, trimmed and thinly sliced
1/2 cup sour cream
1/2 cup buttermilk
Salt
Pepper

Directions
Adjust and oven rack to the middle position and preheat to 450 degree Fahrenheit.

Poke several holes into each potato with a skewer or fork. Microwave on high for about 8 minutes, or until slightly soft to the touch. Transfer the potatoes to the oven and cook directly on the middle oven rack until a skewer slide in easily, about 20 minutes.

Remove the potatoes from the oven and let cool for about 10 minutes. Reduce the oven temperature to 350 degrees Fahrenheit.

Slice the potatoes in half lengthwise. Using a spoon, scoop the flesh out of each half and transfer to a bowl, leaving a 1/4-inch thick shell. Arrange the shells upright on the baking sheet and return them to the oven. Bake about 10 minutes, or until slightly dry and crisp.

While the shells are cooking, mash the potato flesh until smooth. Stir in the cheese, sour cream, buttermilk and scallions. Season with salt and pepper to taste.

Remove the shells from the oven and increase the temperature to 500 degrees Fahrenheit.

Carefully spoon the potato mixture into the shells. Return the stuffed potatoes to the oven and bake until spotty brown and crisp, about 15 minutes. Remove from the oven and allow to cool for 10 minutes before serving.

Makes 8 servings.

Monday, October 10, 2011

Vegetable Soup

Classic vegetable soup is an odd form of comfort food for me. My mother used to served canned vegetable soup from time to time and, to be honest, I didn’t like it. Little did I know that making it myself would change my feelings. This recipe, stolen from America’s Test Kitchen, is delicious. It’s comfort food, improved on.

To improve the flavor, cook the vegetables over low heat using some of the same techniques as quick soups. This draws out the natural sweetness of the vegetables and improves the flavor of store-bought vegetable broth. You could make this with chicken broth, but I don’t recommend it. This soup is much better when the vegetables take center stage. If you’d like, replace the potatoes with a can of white beans. Just drain and rinse them before adding to the pot.

Equipment Needed
Cutting board
Chef’s knife
Garlic press
Fine-mesh strainer
Measuring cups and spoons
Dutch oven or large pot (6 quart)
Vegetable peeler
Large spoon
Mixing bowls

Ingredients
1 onion, minced
2 stalks celery, finely chopped
2 carrots, finely chopped
2 cloves garlic, minced
2 medium russet potatoes, cut into 1/2-inch cubes
1 14.5 oz. can diced tomatoes, drained
2 Tablespoons olive oil
Salt as needed
5 cups vegetable broth
1 cup frozen peas, thawed
Ground black pepper

Directions
Heat the oil in a large Dutch oven or 6 quart pot over medium-low heat until shimmering. Stir in the onion, celery, carrots, garlic, and 3/4 tsp salt. Cover and cook until soft, stirring occasionally, about 20 minutes.

Stir in the broth, potatoes, and tomatoes. Bring to simmer and cook until the potatoes are tender, about 15 minutes. Add the peas and remove from the heat. Let the soup stand for 2 minutes. Season with additional salt and pepper to taste.

Makes 6 servings.

Wednesday, August 31, 2011

Cream of Pea Soup

I have always liked peas. I’ve eaten plenty of split pea soup in my life, too, but I wasn’t in the mood for something heavy in the middle of summer. Finding this recipe for cream of pea soup seemed like it might be just the right solution for a light summer meal.

What I don’t like about most cream soups is they taste mostly like cream. It’s like the vegetables were there just to make your mother, or nutritionist, happy. I wanted more robust vegetable flavor. According to America’s Test Kitchen, processing the raw veggies before adding them to the soup helps add flavor and reduce cooking time. Certainly the flavors in this cream of pea soup recipe were brighter and fresher than I expected.

I had a problem, though. My food processor broke down and I’ve not replaced it. I tried using my blender instead, chopping up the peas in batches, but the results were less than desirable. Most of the peas broke up, but I suspect I would have gotten smoother results if I’d used a food processor. Cleaning the blender wasn’t any fun, either

This recipe uses frozen peas, but you can substitute equal amounts of other fresh or frozen vegetables. Broccoli, asparagus, or carrots also make delicious cream soups. You could even try combining them. If you use fresh veggies, I recommend blanching them before chopping them.

Equipment Needed
Cutting board
Chef’s knife
Food processor
Measuring cups and spoons
Large cooking pot or Dutch Oven
Large spoon
Rubber spatula
Blender or Hand Blender

Ingredients
1 yellow onion
1 1/2 pounds frozen peas, thawed
2 Tbl butter
Salt as needed
2 Tbl all-purpose flour
4 cups chicken broth
1/2 cup heavy cream
Ground black pepper
Chopped parsley or chives to garnish

Directions
Peel and mince the onion into very small pieces and set aside. Place the peas in a food processor and pulse until chopped fine.

Melt the butter in a large cooking pot or Dutch oven over medium heat. Add the onion and 1/2 tsp salt and cook until softened, stirring occasionally, about 5 minutes. Stir in the flour and cook for 1 minute more. This removes the “raw” flavor of flour.

Slowly stir in the chicken broth, scraping any browned bits (fond) from the bottom of the pan. Bring to a simmer, cover and cook for 5 minutes. Add the peas and simmer until tender, about 8 to 10 minutes more. Puree in batches in batches a food processor or blender. Alternately, you can use a hand blender.

Return the pureed soup to the pot and stir in the cream. Bring the soup to a brief simmer, then remove from the heat. Season with salt and pepper to taste. Garnish with chopped parsley or chives.

Makes 6 main dish or 8 side dish servings.

I like eating cream soups with crusty bread and butter. It makes an excellent light lunch or dinner.


For a vegetarian version of this soup, substitute vegetable stock for the chicken stock.

Monday, August 15, 2011

Creamy Polenta with Parmesan Cheese

Polenta can be quite a nice treat, either as a side dish or main course. It’s odd to think that this much sought after, and sometimes expensive, dish began life as congealed corn much. Yup! Let hot corn mush harden and you’ve got polenta.

Italians don’t only each it after it’s firmed up, though. Intelligent foodistas that they are, they enjoy it hot from the pan as well, as creamy polenta. It’s the ultimate comfort food.

Contrary to what some may tell you, the best polenta is made from coarsely ground cornmeal. If you like eating craft glue, by all means, use a fine ground cornmeal. Otherwise, stick with a course grind. Stone-ground cornmeal is a close second choice, but because of it’s uneven grind, you get uneven results.

One of the nice things about this recipe is that it's so easy. My ten year old made the polenta you see pictured.

Equipment needed
Cutting board
Chef’s knife
Microplane or rasp grater
Measuring cups and spoons
Saucepan
Whisk
Wooden (or plastic) spoon

Ingredients
3 Tbl butter
2 ounces Parmesan cheese (1 cup, grated)
6 cups water
1 1/2 cups coarsely ground cornmeal
Salt as needed

Directions
Cut the butter into large chunks and set aside. Grate the cheese with a fine rasp grater or microplane. You should end up with about 1 cup of grated Parmesan.

Bring 6 cups water to a boil in a medium saucepan. Add 1 1/2 tsp salt. Slowly add the cornmeal, whisking the whole time to avoid clumps. Reduce to a simmer, stirring constantly. Cover and reduce the heat to low. Continue stirring often, making sure you get into the corners of the pan, until the polenta is smooth and soft. This can take anywhere from 5 to 30 minutes, depending on the humidity and corn meal. Taste to check if it’s done. It should have a warm toasted corn flavor and be smooth in texture. Stir in the butter and grated Parmesan. Season with additional salt to taste and serve.

Serve with additional Parmesan cheese, your favorite marinara sauce, or with any other desired toppings.

Makes 6 servings.

I posted a recipe for the firmed up version of polenta, earlier. I like this mash recipe better. If you want firm polenta, you can allow this mixture to cool, cutting it into squares and frying just as I did in the original recipe.

Wednesday, August 10, 2011

Braised Green Beans with Bacon

How can you go wrong adding bacon to green beans? I haven’t got a clue. This delicious side dish goes well with almost any entree. The addition of cider vinegar and brown sugar makes the flavor pop.

This recipe uses canned green beans for convenience, but fresh ones are always the best choice when you can get them. If using fresh green beans, trim the ends and then cut in half, widthwise. Increase the chicken stock to 1 cup and increase the cooking time to 5 minutes.

Equipment needed
Cutting board
Chef’s knife
Skillet
Wooden Spoon
Measuring cups and spoons
Paper towels

Ingredients
1 yellow onion
2 cans green beans, 15 oz cans
6 slices bacon
1/4 cup chicken broth
2 Tbl apple cider vinegar
1 Tbl brown sugar
1/2 tsp dried thyme
salt and pepper

Directions
Peel and mince the onion into 1/8 inch pieces.  Drain the green beans.

Cook the bacon in a 12-inch skillet over medium heat until crispy, about 8 minutes. Turn the bacon over a few times during cooking. Transfer the bacon to a paper-towel-lined plate to cool. When cool enough to handle, chop the bacon and set aside.

In the same skillet, cook the mined onion with a pinch of salt until translucent and starting to brown, about 8 more minutes. Add the drained green beans, broth, vinegar, brown sugar and thyme, along with 1/4 tsp salt and 1/4 tsp ground black pepper. Bring to a brief boil. Lower the heat to medium and cook until most of the liquid evaporates, 1 to 2 minutes. Season with salt and pepper to taste.

Makes 8 servings.

Sunday, July 31, 2011

Caprese Salad, Revisited

Two years ago I posted a recipe for Caprese salad, a cold salad made from tomatoes and mozzarella cheese. I always like to try new recipes and this version turned out so much better than the first, that I thought I’d share it with you.

Caprese salad is a wonderful cold side dish for hot summer days. It’s bright flavors make a nice change from traditional green salads. It’s at it’s best with fresh tomatoes ripe from the vine, but store-bought ones can be used nicely, as well. Although I use Roma tomatoes in this recipe, you can easily substitute cherry tomatoes, grape tomatoes, or any firm tomato from your garden.

Using fresh mozzarella cheese is vital for the success of this recipe. The blocks you find in the grocer’s refrigerator section aren’t going to cut it. Go to the deli counter and find the round balls of fresh mozzarella. They are tender and creamy, not hard and dry.

Equipment needed
Cutting board
Paring knife
Chef’s knife
Mixing bowls
Salad spinner
Fine-mesh strainer
Small saucepan
Rubber spatula
Whisk
Measuring cups and spoons
Garlic press (optional)

Ingredients
8 Roma tomatoes (or 2 pints of cherry or grape tomatoes)
1 large clove garlic
1 Tbl balsamic vinegar
2 Tbl extra-virgin olive oil
8 ounces fresh mozzarella cheese.
1/2 tsp sugar
Salt
3 Tbl dried basil (or 1 cup chopped fresh basil)
Ground black pepper

Directions
Core the tomatoes with a paring knife. Quarter lengthwise and cut into 1/2-inch pieces. Toss the tomatoes, sugar, and 1/4 tsp salt together in a mixing bowl, cover, and let stand for 30 minutes. This helps season the tomatoes, and draw out some of their excess liquid.

In the meantime, mince the garlic using a garlic press or chef’s knife. Cut the mozzarella into 1/2-inch chunks.

Transfer the tomatoes and any accumulated liquid to a salad spinner and spin to remove seeds and liquid. Return the tomatoes to the mixing bowl and pour the tomato liquid through a fine mesh strainer over a small saucepan to remove the seeds and reserve the liquid. You should have about 1/2 cup of extracted juice.

Add the vinegar and garlic to the saucepan with the tomato juice. Turn the heat to medium and bring to a simmer. Cook, stirring occasionally, until reduced to 3 tablespoons, about 5-7 minutes.

Cool the tomato juice mixture to room temperature. Whisk in the extra-virgin olive oil. Add the tomato juice mixture to the mixing bowl with the tomatoes. Add the cheese and basil then toss to combine. Season with salt and pepper to taste.

Makes 4 – 6 servings.

Wednesday, July 27, 2011

Roasted Bell Peppers, the Easy Way

There’s no reason to pay for a jar of roasted bell peppers when you can make them easily and affordably at home. All it takes is a good baking sheet, your broiler, and a bit of attention. Cutting the peppers and removing the seeds before roasting makes it easier to remove the skin, and lets you avoid rinsing them. Washing them removes much of the flavor, not just the skin.

Equipment Needed
Cutting board
Chef’s knife
Rimmed baking sheet
Aluminum foil
Mixing bowls
Plastic wrap

Ingredients
4 sweet bell peppers, red or green
Extra-virgin olive oil
Salt

Directions
 

Cut 1/4 inch from the top and bottom of each pepper and gently remove the stem from the lobe.


Lay the pepper on it’s side, and cut through one side the pepper, horizontally, rolling it as you cut, to remove the seeds and ribs in one fell swoop. Cut the pepper strips as needed to get them to lay flat.

Adjust the oven rack so that it is 2 1/2 to 3 1/2 inches from the boiler element. Head the broiler (500 °F) for 5 minutes. If your oven rack is more than 3 1/2 inches from the broiler, set an upside down rimmed baking sheet on it to raise the level.


Line a rimmed baking sheet with aluminum foil. Arrange the pieces of sweet pepper on the baking sheet, skin side up. Flatten them as needed. Cook under the broiler until the skin is spotty brown and puffed up, about 9 minutes. Rotate the sheet halfway through cooking to ensure even browning.


Transfer the hot peppers to a large bowl and cover with plastic wrap. Let them steam for at least 10 minutes or longer if they need to cool more so they can be easily handled. Peel and discard the skin from each piece.

The peppers can be stored in an airtight container for use in other recipes, but can also be served as an appetizer. Slice the peppers into strips, drizzle a little olive oil over them, and season with salt to taste.

Thursday, July 14, 2011

Cauliflower – Brussel Sprout Gratin

My kids love brussel sprouts and cauliflower. It’s my wife’s fault. I take no claim to such strange behavior. I like them, but not enough to go crazy over them. Because I tend to dote on my little mutants, though, I cook brussel sprouts and cauliflower from time to time.

A few weeks ago, I found myself with a small head of cauliflower and about a pound of brussel sprouts that needed to be used. Not enough of either one for a proper dish, but combined … well, I just might have something. What about a vegetable gratin? I think the results were tasty, and my family certainly enjoyed them enough that there weren’t any leftovers.

This dish uses frozen brussel sprouts because I can’t often get fresh ones at my local grocer. If you use fresh ones, par-boil them before using in the recipe.

Equipment Needed
Cutting board
Small saucepanFood processor or blender
Dutch oven or other large pot
Colander
12-inch SkilletWhisk
Glass baking dish
Garlic press (optional)
Rasp grater or micro-plane
Paring knife
Ingredients
1 small head cauliflower
1 pound frozen brussel sprouts
1/2 yellow onion
2 cloves garlic
3/4 cup Parmesan cheese
4 Tbl butter
4 slices quality sandwich bread
1 Tbl all-purpose flour
1 cup plain yoghurt
1/2 cup milk
1 /2 tsp dried thyme
1 pinch nutmeg
1 pinch cayenne pepper
Salt and ground black pepper

Directions
Remove the leaves and core of the cauliflower and cut into florets the same size as the brussel sprouts to promote even cooking, about 1-inch pieces. Peel and mince the onion. Peel and mince the garlic. Grate the cheese with a small rasp grater or micro-plane. Remove the brussel sprouts from the freezer and set aside. Par boil them if using fresh ones.

Placing a cooking rack in the center position, preheat the oven to 450 degrees Fahrenheit.

For the Crumb Topping
You can use already made bread crumbs if you want, but making them fresh isn’t hard and give great results.

Melt 2 Tbl butter in a small saucepan over medium heat. Put the bread slices into a food processor, along with the melted butter 1/4 tsp salt and 1/8 tsp ground black pepper. Pulse about times to create bread crumbs and combine. Set aside.

For the Vegetables
Bring 4 quarts of water to boil in a large cooking pot or Dutch oven. Add 1 Tbl salt. Add the caulflower florets to the water and boil until most tender, about 4 minutes. Drain in a colander, rinse under cold water to stop the cooking process, and let drain fully.

For the sauce
Melt the remaining 2 Tbl butter in a 12 inch skillet over medium heat. Add the onion and cook until softened, about 2 minutes. Stir in the garlic and cook an addition 30 seconds until fragrant. Stir in the flour to coat. Whisk in the yoghurt and milk and bring the whole to a boil. Add 1/2 cup of the Parmesan, thyme, nutmeg, cayenne, 1/4 tsp salt and 1/8 tsp ground black pepper. Remove from the heat.

Gently stir the cauliflower and brussel sprouts into the yoghurt mixture. Transfer to a 9 x 9 inch, or other medium sized baking dish. Spring the top evenly with the remaining 1/4 cup Parmesan and the bread crumb mixture. Bake until golden brown with the sauce bubbling around the edges, about 12 minutes.

Makes 6 servings.

Tuesday, October 19, 2010

Spaghetti with Garlic, Olives, and Herbs

Posting two pasta dishes in a row? You've think I'd gone pasta crazy. I'd have a hard time arguing that, but in this case, it's actually my oldest daughter, Writer Girl. The one who likes making candy? She's discovered she likes to make pasta dishes, too.

This offering is a simple, vegetarian, spaghetti recipe that gets it's flavors from aromatic olives, garlic, and herbs. It's a perfect break from heavier meals. The original recipe comes from Julia Della Croce, but this is our version. modified to make it slightly easier to make.

Equipment needed
Large Skillet
Small Skillet
Large saucepan
Measuring cups and spoons
Kitchen knife


Ingredients
1/2 cup Extra Virgin Olive Oil
6 large Garlic cloves, Very finely chopped
3 tablespoons flat-leaf parsley, chopped
1 teaspoon Fresh Marjoram, chopped
1/3 cup Black Olives, Pitted and Sliced
Pinch Red Pepper Flakes, crushed
1 pound Spaghetti
Salt, to taste
1/4 cup Fresh Bread Crumbs, lightly toasted

Directions
Combine all but 2 Tablespoons of the olive oil and the garlic in a deep, broad skillet. Turn the heat to medium low and saute until the garlic softens and begins to color lightly, about 5 minutes. Stir in the parsley, marjoram, olives, pepper flakes and warm through, about 20 seconds. remove from heat.

Meanwhile, bring 4 quarts of water to a boil. Add 1 1/2 tablespoons of salt and the spaghetti. Cook until al dente, stirring frequently to prevent the strands from sticking together. Drain the pasta, reserving some of the cooking water to moisten the pasta sauce.

While the pasts is still dripping and moist, transfer to the skillet with the sauce and toss together. If it needs more moisture add a little of reserved cooking water.

In a separate small skillet, heat remaining olive oil and add the bread crumbs. Saute over medium low heat, until crunchy. Sprinkle the crumbs over the pasta, and serve.

Makes 4-6 servings.

Tuesday, September 21, 2010

Guest Blog - Black Bean and Mango Salad

Here's a great entry from my friend M. Ryan Taylor. He started a diet and exercise plan a few months ago and has found amazing success. He's really looking great. I asked him to share his story with us and he graciously gave us a wonderful salad recipe as well.


When John offered to let me come on Mormon Foodie and do a guest post, I almost instantly had an idea for a new recipe that I wanted to try. Since then I've tested it and refined it a little. For me, the perfect recipe is one that is simple, healthy and delicious; I'll talk more about that in a minute, but first the unveiling:

Black Bean and Mango Salad with Lime Dressing

Salad
I Can Organic Black Beans, well-rinsed and drained
I Large Mango (or 2 Small), cubed
1/4 C Red Onion, diced

Dressing
3 T Olive Oil
2 T Organic Lime Juice
1/2 tsp Salt

Place salad fixings in a medium bowl. Whisk together dressing and then toss into the salad. Spinkle with a GENEROUS amount of freshly ground pepper (oo la la) and serve. Add additional salt to taste.

Yum! I'm for sure keeping this in the rotation.

So why simple, delicious and healthy? I've been on personal health safari for the last six months. I've managed to drop a little over 50 of 200 unwanted pounds in that time (yes, I'm a really big guy). I've also discovered a few things along the path that make it seem like I'll be able to stick with it for the long haul.

First of all, let's start with healthy, because that's where everything starts. If you aren't healthy, the only way you are going to want to live is vicariously - though the TV, through spectator sports, through games, pointless online time fiddling . . . we could craft an entire list of ways (I'm guilty as anyone) to avoid living our lives. Making your health a priority is not only going to help you, it will make you a better more interactive family member, more useful and alert in your career, and more in tune with your God because your more capable of serving your fellowmen. So, health first. Make it number one and everything else in your life will benefit.

Why delicious? Sorry, it doesn't matter how good it is for you, you just aren't going to eat it over the long-haul if you don't enjoy it. Enough said.

Simple . . . let's face it; once in a while we have time to really pull out the 'big guns' and craft some recipe that takes four or more hours of prep (once I made a manicotti creation that took all day). For special occasions that is fine, but for the every day . . . learn how to be a minimalist in your cooking. Recipes that focus on real food that tastes good because it is fresh; recipes that can be made in less than a half an hour . . . these are the ones worth having a celebration over because they are going to make it easy for you to eat right.

John asked me to share a little about what else has worked for me. Other than eating no more than I need every four hours or so, and only whole, nutrient-rich foods (organically grown when I can get them), I've added a whole lot of movement to my life. I started off with some stationary biking and then did a bunch of hiking over the summer (over 37 hikes). I've done some weights and calisthenics. I'm gearing up to start a biking/Pilates cross-training program (writing about it on assignment from Classical Singer Magazine). It doesn't matter what you choose to do though, as long as you move, the more the better. You will find the time if you make it your first priority. Get your loved ones involved. This was the best Summer ever, because my wife Dixie was hiking every step of the way with me.

Final thought, John and I are both composers (that's how I met him) and making a recipe is a lot like composing music. You do have to know your ingredients, but once you do you can throw them together in unexpected ways and often the results are amazing. So go ahead; you know your apples from your oranges. Start throwing things together, try new things; every now and then you'll have a keeper and it will make it that much easier to keep eating simple, healthy and delicious.

For specifics on the eating plan Ryan is following, check out Isabel's Diet Solution.


Thanks Ryan!

Monday, June 21, 2010

Spaghetti w/Cauliflower, Broccoli, Mustard

Cauliflower is not my favorite vegetable. This is one of only a handful of recipes that actually gets me to buy it. Blended with the broccoli and mustard butter, the cauliflower gives body to the sauce. It has a light flavor that

This recipe is inspired by a similar recipe from Deborah Madison and Edward Espe Brown, founders of Green's Restaurant, a vegetarian restaurant on San Francisco Bay. To be honest, I've never been there. I just have the Green's Cookbook.

I've modified their original recipe to make it a little easier to prepare with ingredients I had on hand. For example, they used fresh spinach pasta, I used dried spaghetti. Fresh is probably better for this dish. I think it would be perfect over almost any flavored pasta, or even whole wheat pasta. The lovely and light flavors of the sauce enhance the flavor of the pasta, without covering it up.

Equipment needed
Large pot
Electric mixer or whisk
Mixing bowl
Frying pan
Measuring cups and spoons
Chef's knife

Ingredients
16 oz. dried spaghetti or other pasta
7 tablespoons butter, softened
2 tablespoons Dijon or other strong mustard.
1/2 yellow onion, finely diced.
3 cloves garlic, minced
1 teaspoon white wine vinegar
1 teaspoon lemon juice
2 tablespoons fresh chopped parsley, or 2 teaspoon dried
3 cups cauliflower florets, broken into tiny pieces
2 cups broccoli florets, cut into small florets
salt and pepper as needed
Parmesan, or other hard grating cheese.

Directions
Place the butter, along with the mustard, onion, garlic, vinegar and parsley, in a mixing bowl. Cream together with an electric mixer or whisk, and set aside. This can be done well in advance and refrigerated if needed.

Put a large pot of water on the stove to boil. When the water starts to boil, salt the water to taste and drop in the broccoli and cauliflower. Return the water to a boil and cook the vegetables for about 1 minute. Remove the vegetables with a strainer, return the water to a boil, and add the pasta to the water.

While the pasta is cooking, melt the flavored butter in a large skillet over medium heat. Add the cooked broccoli and cauliflower to the pan, along with 1/2 cup of the pasta water, and cook over medium heat for a few minutes to heat through until the sauce reduces slightly. Add the lemon juice and toss well. Cover the pan and turn off the heat.

When the pasta is done cooking, drain the water and toss with the sauce, along with salt and a generous amount ground black pepper to season. Serve with grated Parmesan cheese on top.

Makes 4 servings.